Documentation
Eventix - Event Landing WordPress Theme
Thank you so much for purchasing our item from themeforest.
- Version: 3.0
- By: Thematicwebs
- Published: 14 April 2015
- Last Update: 16 April 2025
If you have any questions that are beyond the scope of this help file, Please feel free to email via Item Support Page.
Installation
Documentation and examples how to install: WordPress, our Theme and the Required Plugins.
Installing WordPress
Before beginning the installation and configuring of your new theme, you must first have WordPress already installed on a server. There is a very detailed guide at Wordpress Codex which will walk you through every step.
Installing Theme
Theme installation can be done through your WordPress Dashboard using the uploader or via FTP connection to your server directly.
Uploading Through WordPress
- Select "Appearance" and then "Themes"
- Select the "Add New" button at the top of the page and then select the "Upload Theme" button
- Choose Eventix theme "eventix.zip" file
- Select "Install Now"
- Once the theme is fully uploaded and installed, click "Activate" to activate the WordPress theme.
- Install and activate required plugins
- Sometimes it does not active some plugins. So if this happen then go to your Dashboard -> Plugins. and activate all required plugins.
One Click Demo Installation
After Installing and activating Eventix theme and its required plugin, you can set a demo of Eventix site on your server
Intall Eventix WordPress Theme Demo
- Select "Appearance" and then "Import Demo Data"
- Scroll down and click on "Import Demo Data" Button
- Scroll down and click on "Continue & Import" button
- After completion, please check all pages.
- Your website demo is ready.
Eventix Options
A very powerful Theme Options Panel is provided with Eventix. You can handle and customise the theme by using these options easily.
- Just go to your site "Dashboard" and select "Eventix Options"

Theme Layout
In Theme Layout, you can control default menu style for your website. Here you have following options
-
Select Layout - Default menu style for website. Here you have two options.
- Plain Menu - Default Menu Style.
- Hamburger Menu - Menu will open in popup
- Bottom Left Text - Text will show in popup box of hamburger
- Social Icons - A switcher to show/hide the social icons for hamburger menu style
-
Menu Social Icons - A repeater field to add icons multiple times. Each box have the following options
- Social Icon Title - Title of the social icon.
- Social Icon - Social icon.
- Social Icon Link - Link of the social icon.

Color Scheme
In Color Scheme, you can control default color scheme for your website. Here you have the following options.
-
Color Scheme - Default color scheme for website. Here you have two options.
- Default - Here you have 9 predefined color schemes.
- Custom - when you select custom then you can select color scheme for your website.

Preloader Settings
In Preloader Settings, you can control options for preloader screen
- Preloader ? - A switch to Enable/Disable the preloader screen
- Preloader Image - Image for the preloader screen

Header Settings
In Header Settings, you can control default header settings for theme
- Site Logo - Upload image of logo for your website
- Sticky Site Logo - Upload image of logo for sticky navbar of your website
- Site Logo Width - Width for your logo.

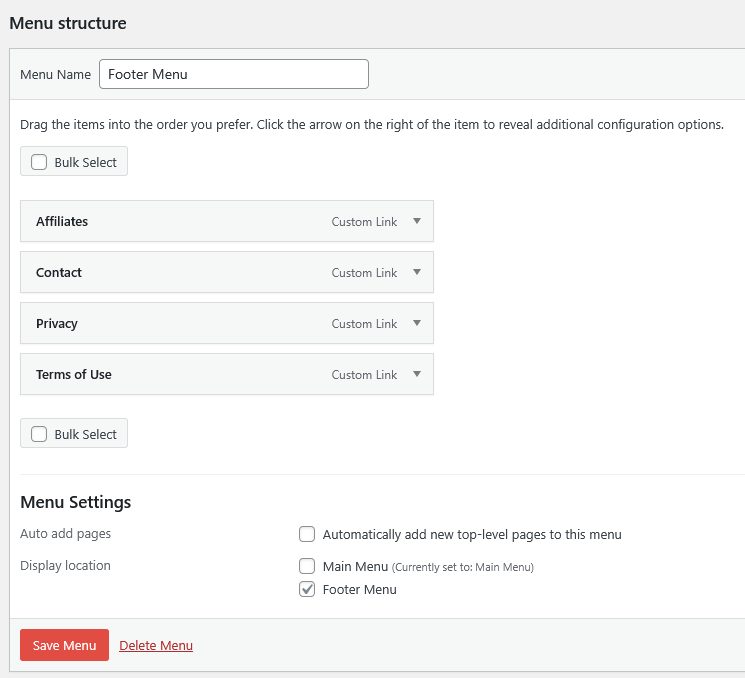
Footer Settings
In Footer Settings, you can control footer options for theme
- Copyright Text
- Show Footer Menu? - A switch to Show/Hide the footer menu in footer.
You can select the footer menu from your site Dashboard -> Appearance -> Menus. Select Footer Menu checkbox for specific menus and save it.

Pages Settings
In Pages Settings, you can control options for following pages
- Blog Page Options
- Archive Page Options
- Author Page Options
- Category Page Options
- Search Page Options
- Tag Page Options
- 404 Page Options
Every page options have the same options except 404 Page
- Banner Background Image - Select/Upload image for banner area.
- Read More Text - Read more button text
- Hide Sidebar ? - Enable this if you want to hide sidebar area.
only Blog Page Option has one extra field
- Banner Heading - Text for banner area.

404 Page
In 404 Page, you can control options for 404 Error page
- Banner Title - Title for banner area
- Banner Background Image - Background image for banner area
- Page Heading
- Page Sub-Heading
- Page Text
- Page Button Text
- Page Button Link

Blog Posts
If you want to add new blog post, go to your site "Dashboard - Posts - Add New". If you want to edit any existing post then go to your site "Dashboard - Posts" and click on any existing post you want to edit.
In each post, you have the same options
- Title - Title of the post
- Text - Detail text about post
-
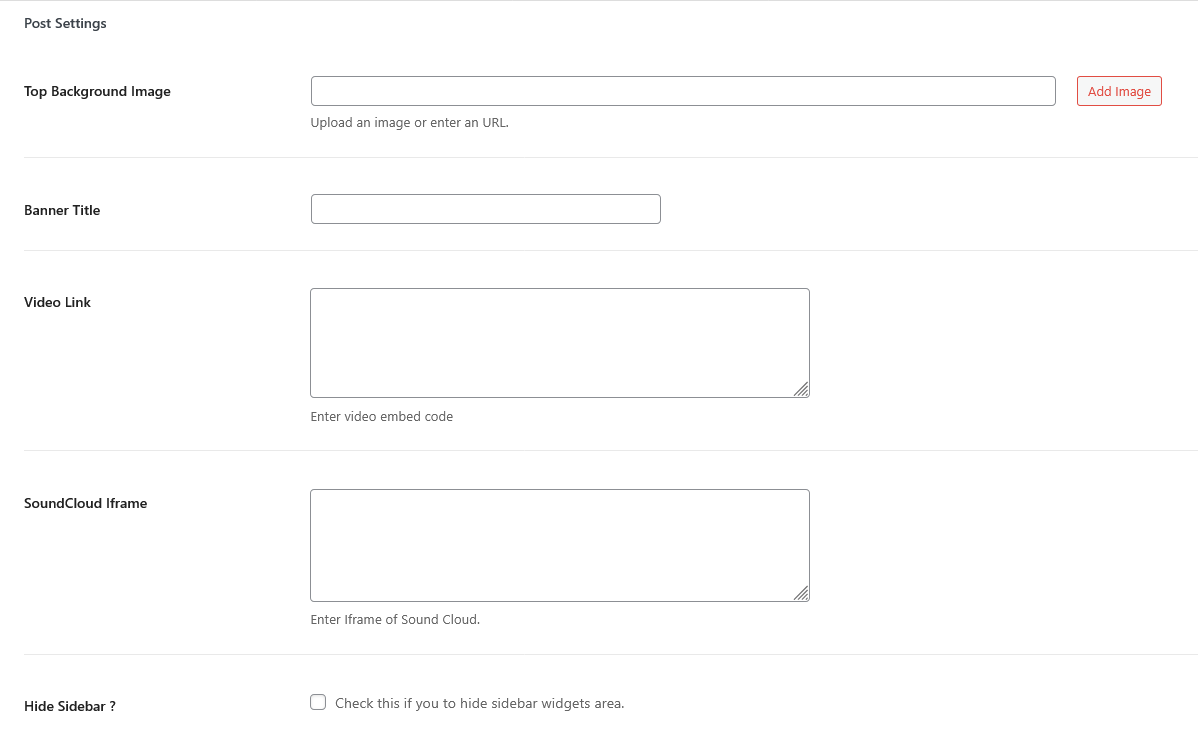
Post Settings - Here you have five options
- Top Background Image
- Banner Title
- Video Link
- SoundCloud Iframe
- Hide Sidebar ?
- Feature Image - Image for post
- Excerpt - An optinal field
-
Status & visibility
- Visibility - Post status ( Public, Private or Password Protected )
- Publish - Publist date of the post
- Stick to the top of the blog - Checbox to make post sticky
- Author - Select author of the post ( for Admin account only)
- Trash - To delete the blog post
- Publish - Date and time for the post.
-
Link
- URL Slug - slug of a post
- View Post - Link to visit the post frontend
- Author - Author the post.
- Template - Select the template for the post.
-
Discussion - Checkbox for the following
- Open/Close
- Allow pingbacks & trackbacks
-
Format - Select format for the post
- Audio
- Standard
- Video
-
Categories
- Checkboxes of post categories
- Add New Category - Option to add new category
- Tags - A field where you can add multiple tags for post
Pages
If you want to add new page, go to your site "Dashboard - Page - Add New". If you want to edit any existing page then go to your site "Dashboard - Pages" and click on any existing page you want to edit.
In each page, you have the same options
- Title - Title of the page
- Textarea - here you can add content about page.
-
Page Settings - Here you have three options
- Full Width ? - Enable/Disable to make page full width or not
- Banner Title
- Banner Background Image
-
Logo Settings - Here you have four options
- Change Navbar Logo ? - Check this if you want to change the default logos for this page
- Start Logo
- Sticky Logo
- Logo Width
-
Layout Settings - Here you have two options
- Change Layout ? - Check this if you want to change the default layout for this page
- Select Layout - Select the layout (Default, Plain OR Hamburder)
-
Color Scheme Settings - Here you have two options
- Change Color Scheme ? - Check this if you want to change the default color scheme for this page
- Custom Color - Select/Pick the color scheme for this page only
-
Menu Settings - Here you have two options
- Change Default Menu ? - Check this if you want to change the default menu for this page
- Select Menu - Select the menu for this page only
- Feature Image - Image for page
-
Status & visibility
- Visibility - Page status ( Public, Private or Password Protected )
- Publish - Publist date of the page
- Author - Select author of the page ( for Admin account only)
- Trash - To delete the current page
- Publish - Select date and time to publish this page
- Link - Add slug for this page
- Author - Select author for this page
- Template - Here you can select template for page
- Discussion - Checkboxes to Allow comments
- Parent - You can select any page as a Parent page of current page
WordPress Pages Article WordPress Create New Page Aticle
We are using Elementor, so we edit page using Elementor.

Contact Form 7
If you want to add new form, go to your site "Dashboard - Contact - Add New". If you want to edit any existing form then go to your site "Dashboard - Contact - Contact Forms" and click on any existing form you want to edit.
In each form, you have the same options
- Title - Title of the form
-
Four Tabs
- Form - Code of the form
- Mail - control email settings
- Messages - Here you can control message for form to show on actions
- Additional Settings - You can add customization code snippets here. For details, see Additional settings.
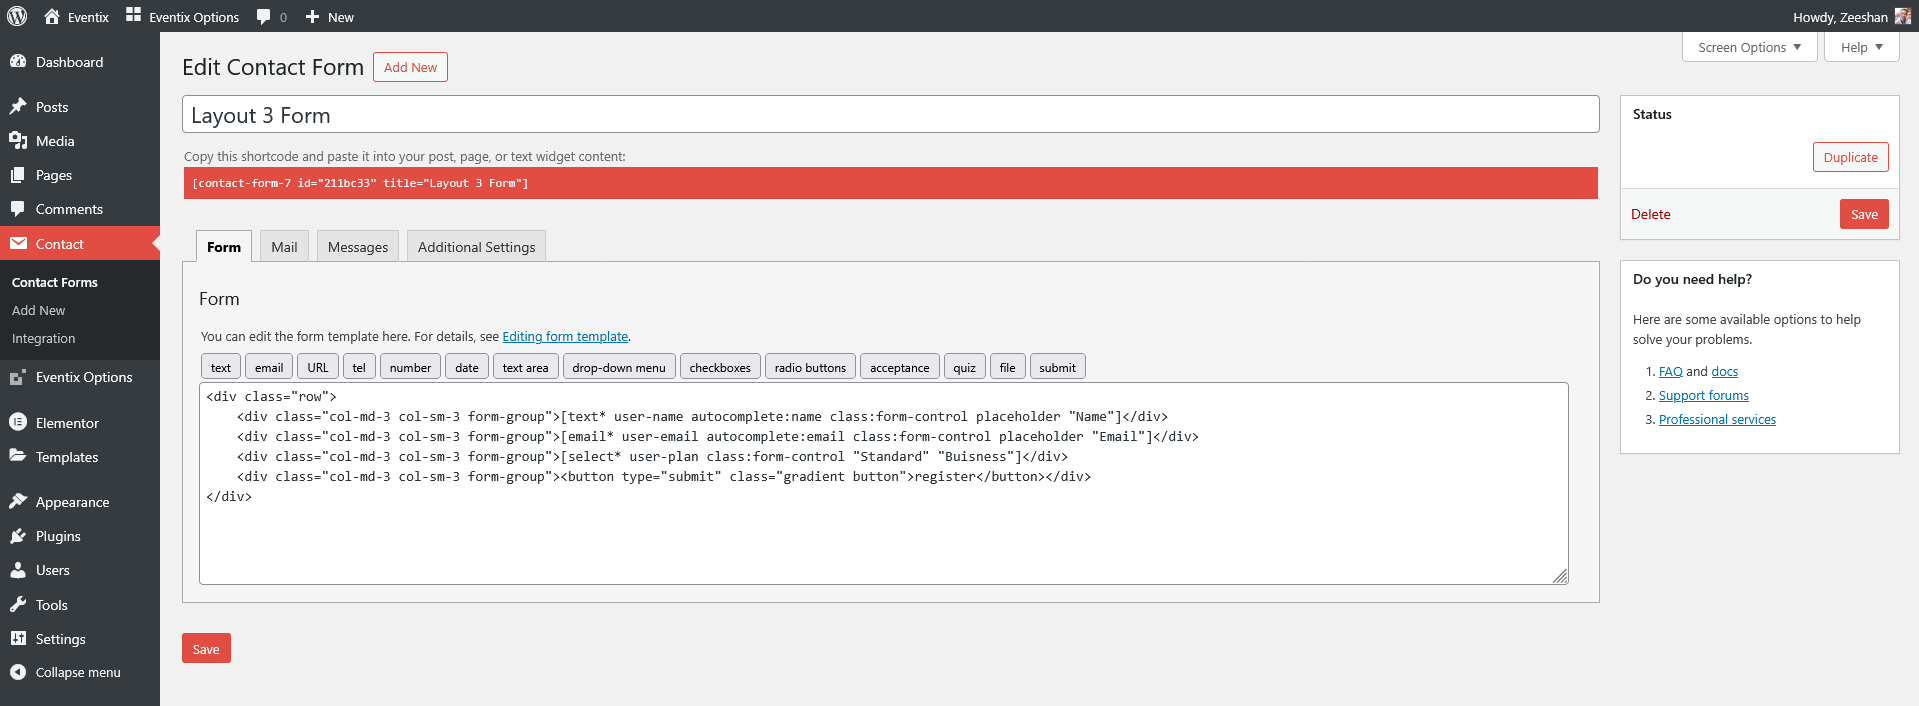
Eventix Forms
In Eventix, we have two forms
- Layout 1 Form
- Layout 3 Form
Layout 1 Form
							<div class="form-inline">

							    <div class="col-md-15 form-group">[text* user-name autocomplete:name class:form-control placeholder "Name"]</div>

							    <div class="col-md-15 form-group">[email* user-email autocomplete:email class:form-control placeholder "Email"]</div>

							    <div class="col-md-15 form-group">[tel* user-tel autocomplete:tel class:form-control placeholder "Telephone"]</div>

							    <div class="col-md-15 form-group">[select* user-plan class:form-control "Standard" "Buisness"]</div>

							    <div class="col-md-15 form-group"><button type="submit" class="gradient button">register</button></div>

							</div>


Layout 3 Form
							<div class="row">

							    <div class="col-md-3 col-sm-3 form-group">[text* user-name autocomplete:name class:form-control placeholder "Name"]</div>

							    <div class="col-md-3 col-sm-3 form-group">[email* user-email autocomplete:email class:form-control placeholder "Email"]</div>

							    <div class="col-md-3 col-sm-3 form-group">[select* user-plan class:form-control "Standard" "Buisness"]</div>

							    <div class="col-md-3 col-sm-3 form-group"><button type="submit" class="gradient button">Register</button></div>

							</div>

Eventix Elements
In Eventix WordPress Theme, you have different elements to add on any page of your website. To use these elements, you have to install "Elementor" plugin. To install this plugin, go to "Dashboard - Plugins" and activate "Elementor".
After installing and activating "Elementor" plugin, just go to any page where you want to add elements and click on "Edit with Elementor".

Eventix Wordpress Theme has 15 sections.
- About with Video
- Gallery
- Call to Action
- Contact Form
- Event Calendar
- Pricing Tables
- Services
- Sponsers
- Testimonials
- Title with Description
- Event Details
- Layout 1 Banner
- Layout 2 Banner
- Layout 3 Banner
- Team Members
Source & Credits
Support
If this documentation doesn't answer your questions, So, Please send us Email via Item Support Page
We are located in GMT +5 time zone and we answer all questions within 12-24 hours in weekdays. In some rare cases the waiting time can be to 48 hours. (except holiday seasons which might take longer).
Don’t forget to Rate this theme
Go to your Themeforest Profile > Downloads Tab & then You can Rate & Review for our theme.
Thank You.
Changelog
Version 3.0 (16 April, 2025)
Initial Release